ASTM A500 Grade C Pipe Specification
Standard and grades: ASTM A500 Grade A, B. C, D
Manufacturing types: Seamless, Welded
Pipe Dimensions Range: NPS 1/8” to 88”
Pipe Schedule Range: SCH 10 to SCH 160 and SCH XXS
Ends: Plain, Beveled
Length range: Fixed length 20 ft and 40 ft, single random length, double random length
Coating: Black paint, anti-rust oil, varnished, galvanized, zinc coating thickness weight is 550g/m2
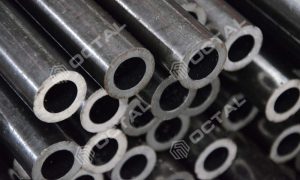
ASTM A500 Grade C applies to cold-formed welded and seamless carbon steel round, square, rectangular, or special shape structural tubing for welded, riveted, or bolted construction of bridges and buildings, and for general structural purposes.
How many grades are there in ASTM A500 standard
There is a total of 7 grades in this standard, Grade A, B, C, and Grade D.
Related Standard for Producing ASTM A500 pipe
A370 Test Methods and Definitions for Mechanical Testing of Steel Products
A700 Practices for Packaging, Marking, and Loading Methods for Steel Products for Shipment
A751 Test Methods, Practices, and Terminology for Chemical Analysis of Steel Products
A941 Terminology Relating to Steel, Stainless Steel, Related Alloys, and Ferroalloys
MIL-STD-129 Marking for Shipment and Storage
MIL-STD-163 Steel Mill Products, Preparation for Shipment and Storage
Fed. Std. No. 123 Marking for Shipment
Fed. Std. No.183 Continuous Identification Marking of Iron and Steel Products
B-I Bar Code Symbology Standard’
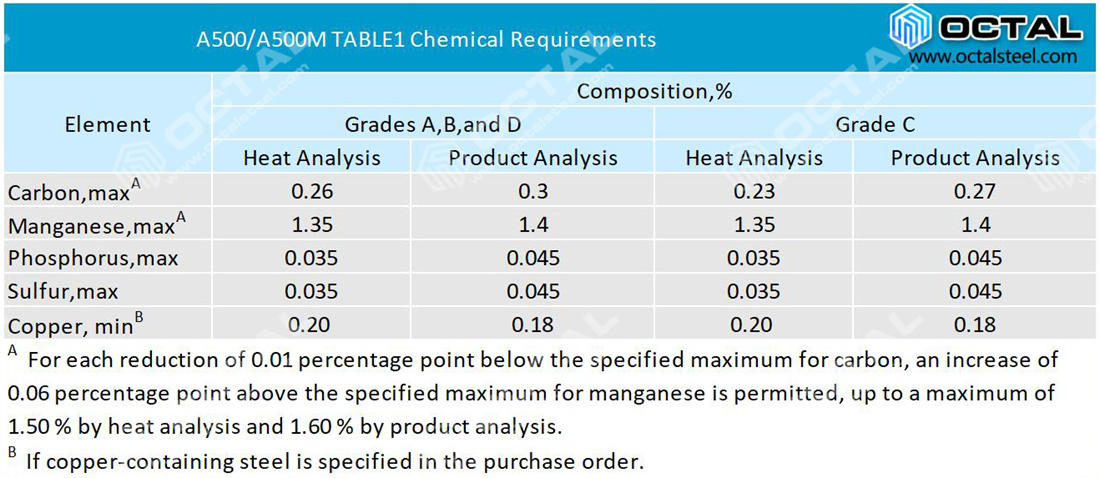
ASTM A500 Chemical Composition
There are differences in chemical composition as shown in the following table:
Yield Strength and Tensile Strength
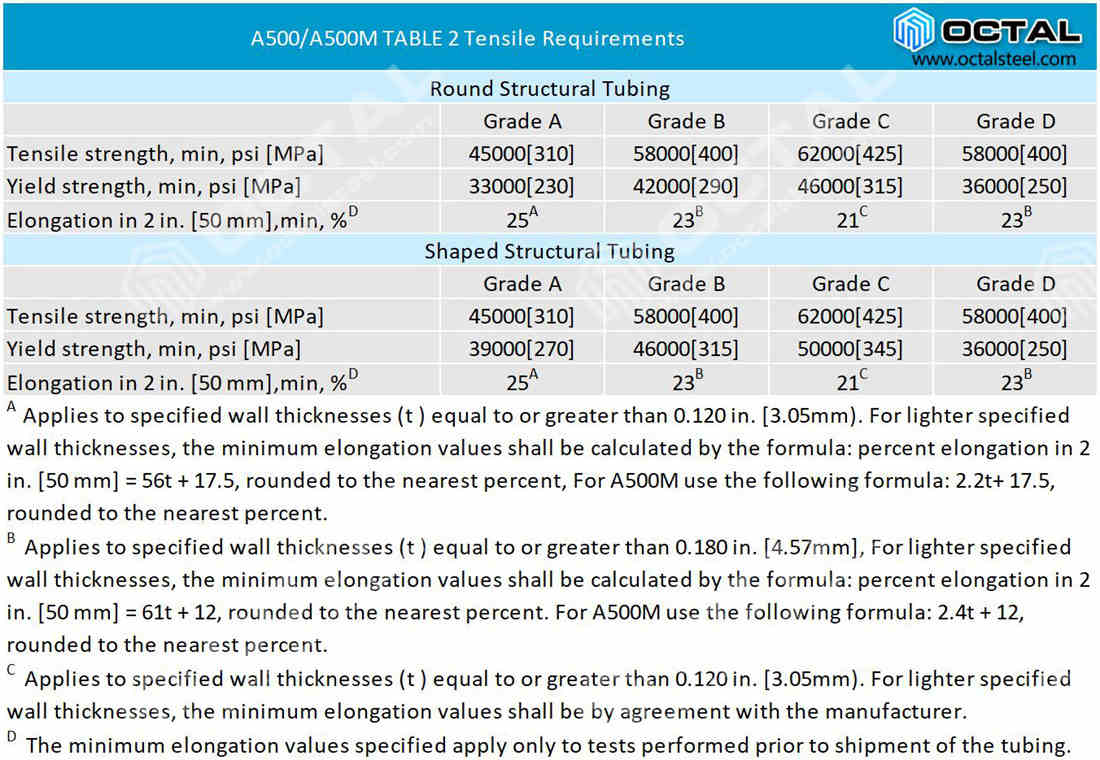
ASTM A500 Manufacture
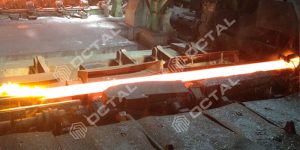
1. The tubing shall be made by a seamless or welding process.
2. Welded tubing shall be made from flat-rolled steel by the electric-resistance-welding process. The longitudinal butt joint of welded tubing shall be welded across its thickness in such a manner that the structural design strength of the tubing section is assured.
3. The weld shall not be located within the radius of the corners of any shaped tube unless specified by the purchaser.
4. Grade D tubing shall be heat treated at a temperature of at least 1100°F [590 C] for one hour per inch [25 mm] of thickness.
ASTM A500 Dimensions and Sizes Schedule
Outside Dimensions.
1. Round Structural Tubing–The outside diameter shall not vary more than +0.5 %, rounded to the nearest 0.005 in.[0.1 mm], from the specified outside diameter for specified outside diameters 1.900 in.[48 mm] and smaller, and+ 0.75 %, rounded to the nearest 0.005 in.[0.1 mm], from the specified outside diameter for specified outside diameters 2.00 in.[5 cm] and larger The outside diameter measurements shall be made at positions at least 2 in. [5 cm] from the ends of the tubing.
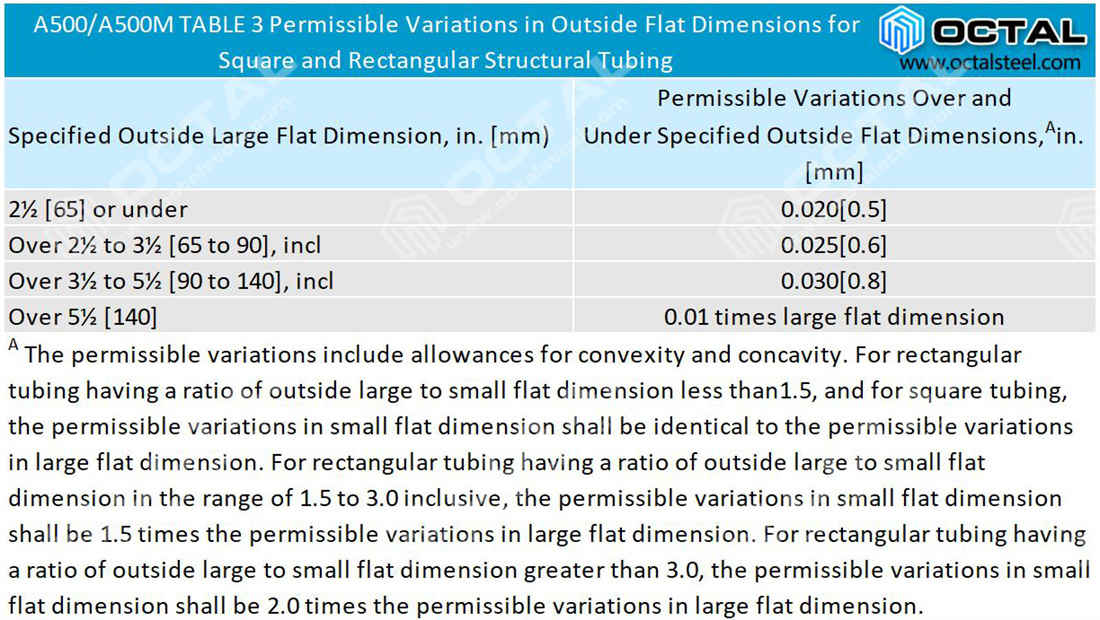
2. Square and Rectangular Structural Tubing-The out-side dimensions, measured across the flats at positions at least 2 in.[5 cm] from the ends of the tubing, shall not vary from the specified outside dimensions by more than the applicable amount given in Table 3 which includes an allowance for convexity or concavity.
3. Wall Thickness – The minimum wall thickness at any point of measurement on the tubing shall be not more than 10 % less than the specified wall thickness. The maximum wall thickness, excluding the weld seam of welded tubing, shall be not more than 10 % greater than the specified wall thickness. For square and rectangular tubing, the wall thickness requirements shall apply only to the centers of the flats.
4. Length-Structural tubing is normally produced in random lengths 5 ft [1.5 m] and over, in multiple lengths, and in specific lengths. When specific lengths are ordered, the length tolerance shall be in accordance with Table 4.

5. Straightness-The permissible variation for straightness of structural tubing shall be in. times the number of feet [10 mm times the number of metres] of total length divided by 5.
6. Radius of Corners-For square and rectangular structural tubing, the radius of each outside corner of the section shall not exceed three times the specified wall thickness.
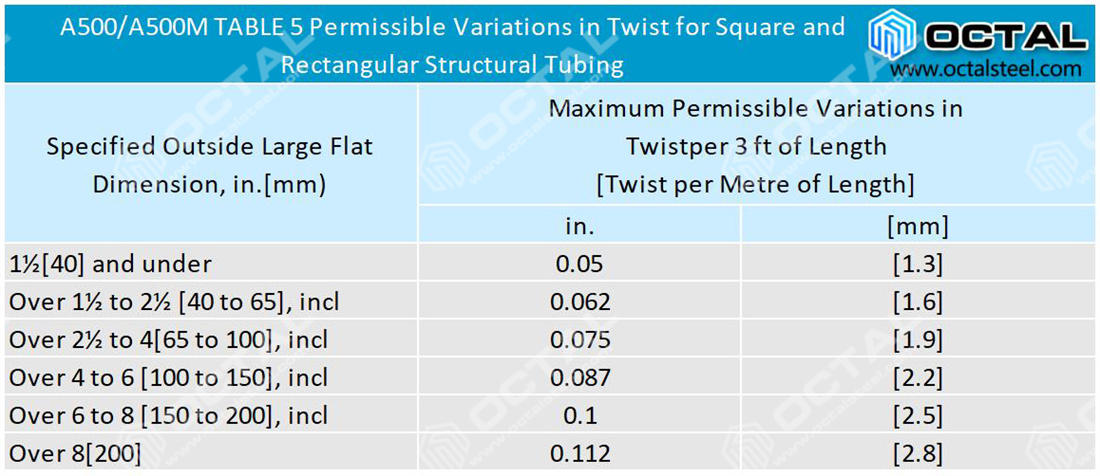
7. Twist-For square and rectangular structural tubing the permissible variations in twist shall be as given in Table 5 Twist shall be determined by holding one end of the tubing down on a fat surface plate, measuring the height that each corner on the bottom side of the tubing extends above the surface plate near the opposite ends of the tubing, and calculating the twist (the difference in heights of such corners).except that for heavier sections it shall be permissible to use a suitable measuring device to determine twist. Twist measurements shall not be taken within 2 in. [5 cm of the ends of the tubing.]
Flattening Test
Flatenning test shall be made on round structural tubing. For shaped structural tubing is not required.
Supply Range
Octal is capable of supply ASTM A500 pipes as below:
Standard and grades: ASTM A500 Grade A, B. C, D
Manufacturing types: Seamless, Welded
Pipe Dimensions Range: NPS 1/8” to 88”
Pipe Schedule Range: SCH 10 to SCH 160 and SCH XXS
Ends: Plain, Beveled
Length range: Fixed length 20 ft and 40 ft, single random length, double random length
Coating: Black paint, anti-rust oil, varnished, galvanized, zinc coating thickness weight is 550g/m2


