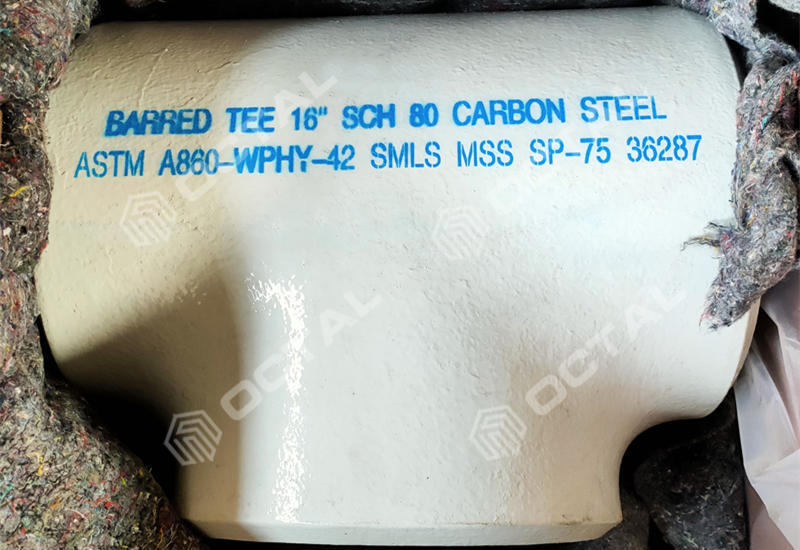
ASTM A860 WPHY 42 Pipe Fittings
Grades: ASTM A860 WHPY 42
Raw material from: API 5L X60, X60M, X60N, X60Q, X60QS, X60MS, X60NS, X60MO
Outer Diameters: 1/2” to 14” in ASME B16.9, 14” to 48” in MSS-SP-75
Wall Thickness Schedule: SCH 20, STD, 40, 80, to SCH 160
Pressure Class: Class 150, 300, 600, 900, 1500, 2500
Manufacturing Standards: ASME B16.9, ASME B16.28, MSS-SP-75
ASTM A860 WPHY42 is the standard specification for wrought high-strength ferritic steel butt-welding. Yield strength minimum 290 Mpa, Tensile strength 415 Mpa to 585 Mpa. The material used for making such pipe fittings is seamless or welded steel pipe of API 5L X42, X42M, X42Q, etc, used for oil and gas transmissions.
Dimensions Standard:
For NPS 14 and smaller butt-welding fitting, please refer to ASME B16.9.
Those larger than NPS 14 (until NPS 48) shall comply with MSS-SP-75.
Materials and Manufacturing
The fitting material shall be completely killed fine-grained, produced by a melting process for producing round, well-dispersed fine sulfide inclusions, which promotes good notch toughness and helps resist hydrogen-induced cracking. It also has weldability for field soldering.
Related Standard for Producing ASTM A860 WPHY 42 Pipe Fittings
A751 Test Methods, Practices, and Terminology for Chemical Analysis of Steel Products
A960/A960M Specification for Common Requirements for Wrought Steel Piping Fittings
B16.9 Steel Butt-Welding Fittings
Section V
Section VIII Division 1
Section IX
MSS SP-25 The Standard Marking System of Valves,Fittings, Flanges and Unions
MSS-SP-75 Specification for High Test Wrought Butt-Welding Fittings
SNT-TC-1A Recommended Practice for Nondestructive Testing Personnel Qualification and Certification
ASTM A860 WPHY 42 Pipe Fittings Data Sheet
Chemical Composition
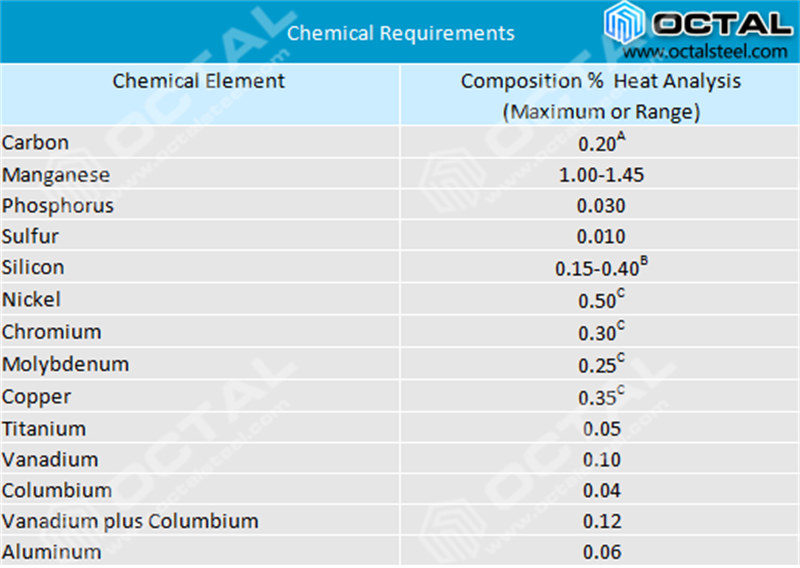
A: The carbon equivalent calculated by the following formula, shall not exceed 0.42%.
CE = C + Mn/6 + (Cr + Mo + V)/5 + (Ni + Cu)/15
B: If vacuum carbon deoxidation is used, silicon shall not exceed 0.10% by heat analysis and 0.12% by product analysis.
C: Ni + Cr + Mo + Cu shall not exceed 1.0%.
Mechanical Properties (ASTM A860 WPHY 42, 52, 60, 65, 70)
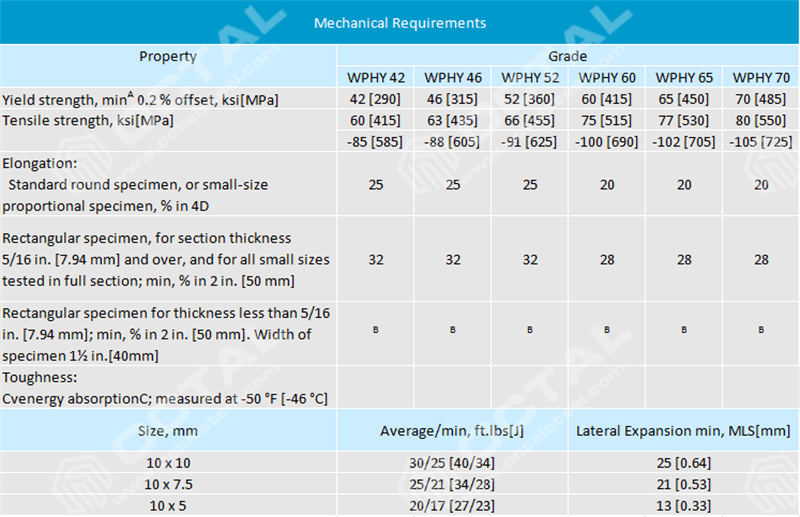
A: Actual yield strength shall not exceed specified minimum by more than 15 kis [105 Mpa]
B: For each 1/32-in.[0.79mm] decrease in section thickness below 5/16 in.[7.97mm], a deduction of 1.5% from the elongation value of specimens above 5/16 in.[7.94mm] is permitted. When the section thickness lies between two values defined above, the minimum elongation is determined by the following equation:
E = 48t + 15.00
Where:
E = elongation % in 2 in.[50mm], and
t = actual thickness of specimen.
C: These requirements are intended to minimize fracture initiation. The requirements are not intended to give assurance against fracture propagation.
Heat Treatment
ASTM A860 WPHY42, 46, 52, 56, 60, 65 and 70 all fittings shall be heat treated. Fittings that are formed above transformation temperature or made by welding, shall be cooled down to critical temperature before heat treatment. The methods include normalizing, quenching, tempering or stress relieving under the specification of ASTM A960/960M.
Hydrostatic Test
Hydrostatic testing is not required by this specification.
All fitting shall be capable of withstanding, after installation, without failure, leakage, or impairment of serviceability, a hydrostatic test pressure of 100% based on minimum yield strength of the material grade, wall thickness, and outside diameter ordered. The hydrostatic pressure shall be calculated in accordance with below equation:
P=2S x t/D
P = Hydrostatic pressure
S = Specific yield strength, min,
t = Nominal wall thickness, and
D = Outside diameter.
Our Supply Range
Grades: ASTM A860 WHPY 42, 46, 52, 56, 60, 65, 70
Outer Diameters: 1/2” to 14” in ASME B16.9, 14” to 48” in MSS-SP-75
Wall Thickness Schedule: SCH 10, SCH 40, SCH 160 comply with ASME B16.9
Pressure Class: Class 150, 300, 600, 900, 1500, 2500
Manufacturing Standards: ASME B16.9, ASME B16.28, MSS-SP-75


